White-Label Payment Box
The Payphone Payment Box is a digital payment solution designed to facilitate secure and agile transactions between businesses and customers. This tool allows accepting payments with credit and debit cards (Visa and MasterCard) and Payphone balance, providing a versatile and practical payment experience for any type of business or online project.
Payphone transforms payments into an easy to implement process using technologies such as HTML and JavaScript, POST requests, ideal for integrating into web pages quickly and without complications. In just a few minutes, you can activate a functional and reliable payment gateway!
Ready to get started?
Payphone payment box flow💳
The Payphone Payment Box is a fast and secure solution to integrate online payments directly into your website. With this tool, your customers will be able to pay with Visa, MasterCard or Payphone balance, without leaving your website.
🚀How does it work? Integration takes place in two key phases:
1. 🧩 Preparation
At this stage the payment button is incorporated into your site using the resources provided by Payphone:
JS script, CSS source and HTML tag.
Allows you to fully control payment actions, recording amounts, taxes and other transaction details.
Accepts payments with Visa, MasterCard, or Payphone balance, providing a complete and flexible payment experience.
2. ✅ Confirmation.
Once the user completes the payment, Payphone redirects to your site with parameters in the URL representing the result of the transaction.
Your system must:
Capture the response parameters.
Make a POST request to the Payphone Confirmation API. Obtain complete transaction details (status, amount, authorization, etc.)
Important Considerations
Before starting with the implementation of the Payphone Payment Box, make sure you meet the following technical and administrative requirements:
🌐 Platform
The Payment Box is designed exclusively for WEB environments. It is not available for mobile applications directly.
🔒 Domain and secure environment
- 🔸It is essential to have a domain with a valid SSL certificate (https://) for production.
- 🔸For purposes of test or local development you can use
http://localhost without the need for an SSL certificate. - 🔸Important: The Payment Box is linked directly to the domain configured in your Payphone account.
- 🔸This means that it will only work on that specific domain. If an attempt is made to run from another unauthorized domain, an authorization error will be displayed and the payment process cannot be completed.
🏢 Payphone Business Account
- 🔸You must have an active Payphone Business account.
- 🔸If you don't have it yet, you can register at: Payphone Business
👨💻 User with Developer role.
- 🔸Within your Payphone Business account, you must create a user with the role of Developer.
- 🔸This user will have access to the technical configurations and to the generation of credentials for integration.
💻 Development environment
Make sure you have a functional development environment, including:
- 🔸Code editor (VSCode, WebStorm, etc.)
- 🔸Updated browser
- 🔸Testing tools such as Postman, Insomnia or cURL
- 🔸Basic knowledge of HTML, JavaScript and consumption of REST APIs
🔑 Obtaining Credentials
From the Payphone developer platform, you will have to:
- 🔸Create a new application configuration.
- 🔸Obtain the credentials required for integration:
TOKEN authentication token (Bearer Token) and STOREID associated with your business
⏭️Next steps
In the following sections we will guide you step by step to correctly implement each of these phases, with practical examples and best practices.
🛠️Insert Payphone payment box
Integrating the Payment Box into your website is quick and easy. You just need to add two scripts, a CSS source, a JavaScript configuration snippet, and an HTML container where the payment button will appear.
🧷 Add dependencies in your page header
- 🔸payphone-payment-box.css: The CSS stylesheet applies the visual layout of the payment button.
- 🔸payphone-payment-box.js: JavaScript SDK enables the control and logic of the payment box.
<head>
      <link rel="stylesheet" href="https://cdn.payphonetodoesposible.com/box/v1.1/payphone-payment-box.css">
      <script type="module" src="https://cdn.payphonetodoesposible.com/box/v1.1/payphone-payment-box.js"></script>
</head>
⚙️ Insert the configuration script
This script is the core of the integration. It defines the transaction data, credentials, taxes, and form behavior. You can place it at the end of the <body> or also in the <head>
<script>
	//Mixed amounts: 1 USD with 15% tax & 2 USD without tax
       window.addEventListener('DOMContentLoaded',()=>{
            ppb = new PPaymentButtonBox({
                token: 'YOUR_TOKEN',	//from Payphone developer
                clientTransactionId: 'UNIQUE_ID_X_TRANSACTION-001',
                amount: 315, 	//Total amount
                amountWithoutTax: 200,
                amountWithTax:100,
                tax: 15,
                service: 0,
                tip:0,
                currency: "USD",
                storeId:"YOUR_STORE_ID",
                reference:"Payment reference Fact#001",
                lang: "es",
                defaultMethod:"card", // *credit-debit card = "card" - *Payphone wallet = "payphone"
                timeZone: -5,
                lat: "-1.831239",
                lng: "-78.183406",
                //Only if you have the cardholder information
                phoneNumber:"+593999999999",
                email: "[email protected]",
                documentId:"1234567890",
                identificationType: 1 //Type of identification: *Document id: 1 *NIT: 2 *Passport: 3 *By default 1.
            }).render('pp-button');
        })
</script>
The third element you must add is a DIV tag that you must place in the section where you want the payment button to appear.
<div id="pp-button"></div>
📈 Examples of basic configurations:
Examples of configurations with minimum fields for different types of collections are shown below:
<script>
	//Example of 1 USD with 15% tax
       window.addEventListener('DOMContentLoaded',()=>{
            ppb = new PPaymentButtonBox({
                token: 'YOUR_TOKEN',
                clientTransactionId: 'UNIQUE_ID_X_TRANSACTION-001',
                amount: 115,
                amountWithTax:100,
                tax: 15,
                currency: "USD",
                storeId:"YOUR_STOREID",
                reference:"Payment reference Fact#001"
            }).render('pp-button');
        })
</script>
<script>
	//Example of 2 USD without taxes
       window.addEventListener('DOMContentLoaded',()=>{
            ppb = new PPaymentButtonBox({
                token: 'YOUR_TOKEN',
                clientTransactionId: 'UNIQUE_ID_X_TRANSACTION-001',
                amount: 200,
                amountWithoutTax: 200,
                currency: "USD",
                storeId:"YOUR_STORE_ID",
                reference:"Payment rerference fact#001"
            }).render('pp-button');
        })
</script>
<script>
	//Example of mixed amounts: 1 USD with 15% tax and 2 USD without tax
       window.addEventListener('DOMContentLoaded',()=>{
            ppb = new PPaymentButtonBox({
                token: 'YOUR_TOKEN',
                clientTransactionId: 'UNIQUE _ID_X_TRANSACTION-001',
                amount: 315,
                amountWithoutTax: 200,
                amountWithTax:100,
                tax: 15,
                currency: "USD",
                storeId:"YOUR_STOREID",
                reference:"Payment reference Fact#001"
            }).render('pp-button');
        })
</script>
🧾Description of parameters in the request:
Below are all the parameters that can be used for a transaction such as amounts to be charged, currency, customer data and other fields that you need to send.
Credential generated in the Payphone Developer configuration.
Total value of the invoice receivable, is the sum of amountWithTax, amountWithoutTax, Tax, service and tip.
Amount not subject to tax.
Amount that includes the taxable value, excluding the tax itself.
Amount of tax applied to the transaction.
Amount associated with the service provided.
Amount of the tip given by the customer.
Currency code ISO 4217. (ex: USD)
Unique identifier assigned by the merchant to each transaction for tracking purposes. Maximum 50 characters
Identifier of the branch that makes the payment (obtained in Payphone Developer).
Reason or specific reference for payment. Maximum 100 characters
Holder's telephone number; will be requested if not provided.Format: Symbol(+) + Country Code + phone number.E.g. +593984111222
E-mail address of the holder; will be requested if not provided.
Holder's identification number; will be requested if not provided.
Type of identification:
*Document ID: 1
*NIT: 2
*Passport: 3
By default, 1.
Form language:
English (en),
Spanish (es).
Default in Spanish.
The default method to display:
*Card = "card"
*Payphone = "payphone"
latitude in decimal format: -1.831239
longitude in decimal format: -78.183406
🛑Warning:
When using the phoneNumber, email y documentId fields in requests to Payphone services, it is crucial to enter the cardholder’s information for each individual transaction.
The use of "burned" or static data is not allowed, as it may result in transaction rejections and user account blocks. The use of false or repetitive data can raise fraud suspicions.
Payphone is committed to protecting the security and privacy of data, which is why it is essential to comply with this policy to ensure a safe and reliable payment process.
🧱 Final code structure:
<!DOCTYPE html>
<html lang="es">
<head>
    <script src="https://cdn.payphonetodoesposible.com/box/v1.1/payphone-payment-box.js" type="module" ></script>
    <link href="https://cdn.payphonetodoesposible.com/box/v1.1/payphone-payment-box.css" rel="stylesheet" >
</head>
<body>
    <script>
       window.addEventListener('DOMContentLoaded',()=>{
            ppb = new PPaymentButtonBox({
                token: 'YOUR_TOKEN',
                clientTransactionId: 'UNIQUE_ID_X_TRANSACCION-001',
                amount: 315,
                amountWithoutTax: 200,
                amountWithTax:100,
                tax: 15,
                currency: "USD",
                storeId:"YOUR_STOREID",
                reference:"Payment reference Fact#001"
            }).render('pp-button');
        })
    </script>
    <div id="pp-button"></div>
</body>
</html>
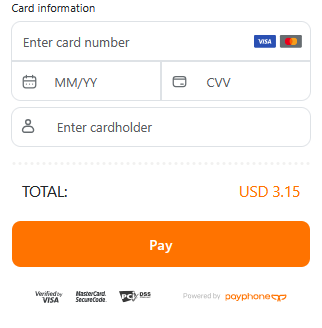
Once you have finished configuring your page with the required fields, the payment box will be displayed as follows:
📌 Considerations.
⏱️ Payment Form lifetime
Each Payment Box form is valid for 10 minutes from the time it is uploaded.
If the user does not complete the payment within that time, the form will expire and a new one will have to be generated.
Note: To ensure payment authorization, it is essential that you redirect the user to the payment form from your web domain configured in the development environment. If the redirection is made from another domain or if the site identity is hidden, the authorization will be denied.
This message will be displayed if your platform does not comply with this condition.

🧾Consult Transaction Response
Upon completion of the payment process, the system will automatically redirect the user to the web page you have configured as the response URL. This page will receive two important parameters in its URL:
🔸id: An integer (int) representing the unique transaction identifier assigned by Payphone.🔸clientTransactionId: A text string that corresponds to the transaction identifier that your platform defined when initiating the payment process.
It is crucial to capture these parameters in order to make a request to the Confirm method.
PHP example to retrieve the ID and ClientTransactionID parameters of a url
$id = isset($_GET["id"])?$_GET["id"]:0;
$clientTransactionId = isset($_GET["clientTransactionId"])?$_GET["clientTransactionId"]:"
✔️Confirm the Transaction Status API Button/Confirm :
Transaction Detail:
This method will provide you with detailed information about the transaction, including whether it was successful or not. With this information, you will be able to display a message to the user confirming the result of the operation.
To use the Confirm method, you must make a POST request to the following URL:
https://pay.payphonetodoesposible.com/api/button/V2/Confirm
The body of the request must be a JSON object containing the following parameters, which are the values received from the response URL:
{
  "id": 0,
  "clientTxId": "string"
}
It is essential to include the following headers in the application:
- Authorization: bearer YOUR_TOKEN (This header must contain your application's authentication token, preceded by the word "Bearer". This token is the same token you used when initially preparing the transaction).
- Content-type: application/json (Indicates that the format of the data sent in the request body is JSON).
‼️Important: Automatic Reverse
If your system does not execute the confirmation phase within 5 minutes after the payment, Payphone will automatically reverse the transaction. This is done to protect both the merchant and the customer, avoiding:
- 🔸Undue charges
- 🔸Incomplete processes due to missing data
- 🔸Customer disputes or complaints
📖 In short: If you do not confirm the payment, Payphone automatically cancels it, as it cannot guarantee that the merchant has correctly recorded the transaction.
Example:
Method and Endpoint:
POST: https://pay.payphonetodoesposible.com/api/button/V2/Confirm

Headers:
Content-Type: application/json
Authorization: bearer YOUR_TOKEN

Body request (JSON):
{
    "id": 23178284,
    "clientTxId": "UNIQUE_ID_X_TRANSACTION-001"
}
📬Successful POST request response.
{
    "email": "[email protected]",
    "cardType": "Credit",
    "bin": "530219",
    "lastDigits": "XX17",
    "deferredCode": "00000000",
    "deferred": false,
    "cardBrandCode": "51",
    "cardBrand": "Mastercard Produbanco/Promerica".,
    "amount": 315,
    "clientTransactionId": "UNIQUE_ID_X_TRANSACTION-001",
    "phoneNumber": "593999999999",
    "statusCode": 3,
    "transactionStatus": "Approved",
    "authorizationCode": "W23178284",
    "message": null,
    "messageCode": 0,
    "transactionId": 23178284,
    "document": "1234567890",
    "currency": "USD",
    "optionalParameter3": "Extra Description",
    "optionalParameter4": "ELISABETH SOBECK",
    "storeName": "Payphone Store",
    "date": "2023-10-10T11:57:26.367",
    "regionIso": "EC",
    "transactionType": "Classic",
    "reference": "Payment for sale Fact#001"
}
📃Description of response parameters
Once the call is successful you will get a JSON with the following parameters:
Transaction status code.
2 = Cancelled.
3 = Aproved.
Transaction status (Approved or Canceled).
Transaction identifier that you sent in the request.
Transaction identifier assigned by Payphone.
The e-mail address registered in the payment form.
Telephone number registered in the form for payment.
ID number registered in the form for payment.
Type of card used (credit or debit).
Card brand. VISA or Mastercard and Issuing Bank
First 6 digits of the card used.
Last digits of the card used.
Deferred code used by the user.
Indicates whether a deferral (Boolean) was used.
Error message, if applicable
Currency used for payment.
Name of cardholder if paying by credit card
Name of the store I charge
Collection date in ISO 8601 format
Country codes in ISO 3166-1
🧱 Button/Confirm API Implementation Example
Below are several examples of how to make POST requests:
<?php
    //Get the parameters sent by Payphone in the response url
    $id = isset($_GET["id"])?$_GET["id"]:0;
    $clientTxId = isset($_GET["clientTransactionId"])?$_GET["clientTransactionId"]:"";

    //Preparar cabecera para la solicitud
    $headers[] = 'Authorization: Bearer your_token' ;//CREDENTIALS
    $headers[] = 'Content-Type: application/json' ;//APPLICATION TYPE

    //Preparar objeto JSON para solicitud
    $data = array(
        "id" => (int)$id,
        "clientTxId" => $clientTxId
    );
    $objetoJSON = json_encode($data);

    //Iniciar solicitud curl: POST
    $curl = curl_init();
    curl_setopt($curl, CURLOPT_URL, "https://pay.payphonetodoesposible.com/api/button/V2/Confirm");
    curl_setopt($curl, CURLOPT_POST, 1);

    curl_setopt($curl, CURLOPT_POSTFIELDS, $objetoJSON);
    curl_setopt($curl, CURLOPT_HTTPHEADER, $headers);
    curl_setopt($curl, CURLOPT_RETURNTRANSFER, 1);
    //Respuesta en formato JSON
    $curl_response = curl_exec($curl);
    //Finaliza solicitud curl: POST
    curl_close($curl);


    //Mostrar Resultado en Pantalla
    echo "<h1>Prueba Confirmacion de Transaccion</h1> <br>";

    $result= json_decode($curl_response);
    echo "Respuesta : <pre>".json_encode($result,JSON_UNESCAPED_UNICODE | JSON_PRETTY_PRINT )."</pre>";
?>
<html lang="es">
    <head>
        <meta charset="utf-8">
        <title>Confirmacion con jQuery</title>
        <script src="https://ajax.googleapis.com/ajax/libs/jquery/3.6.0/jquery.min.js"></script>
        <script>
            //---------Get parameters from the response url---------//
            function getQueryVariable(variable) {
                var query = window.location.search.substring(1);
                var vars = query.split("&");
                for (var i=0; i < vars.length; i++) {
                    var pair = vars[i].split("=");
                    if(pair[0] == variable) {
                        return pair[1];
                    }
                }
                return false;
            }

            var id=getQueryVariable('id');
            var clientTxId=getQueryVariable('clientTransactionId');

            $(document).ready(function() {
                $.ajax({
                    url: "https://pay.payphonetodoesposible.com/api/button/V2/Confirm",
                    type: "POST",
                    headers: {
                    "Content-Type": "application/json",
                    "Authorization": "Bearer your_token"
                    },
                    data: JSON.stringify({
                        "id": id,
                        "clientTxId": clientTxId
                    }),
                    success: function(response) {
                        $("#resultado").html(
                            "Respuesta : <pre>" + JSON.stringify(response, null, 2) + "</pre>"
                        );
                    },
                    error: function(error) {
                        $("#resultado").html(
                            "Error en la solicitud : <pre>" + JSON.stringify(error, null, 2) + "</pre>"
                        );
                    }
                });
            });
        </script>
    </head>
    <body>
        <h1>Ejemplo de Solicitud POST con jQuery</h1>
        <div id="resultado"></div>

    </body>
</html>
<html lang="es">
    <head>
        <meta charset="utf-8">
        <title>Confiration using Fetch</title>
        <script>
            //---------Get parameters from the response url---------//
            function getQueryVariable(variable) {
                var query = window.location.search.substring(1);
                var vars = query.split("&");
                for (var i=0; i < vars.length; i++) {
                    var pair = vars[i].split("=");
                    if(pair[0] == variable) {
                        return pair[1];
                    }
                }
                return "0";
            }

            const id=getQueryVariable('id');
            const clientTxId=getQueryVariable('clientTransactionId');

            const  headers = {
                "Content-Type": "application/json",
                "Authorization": "Bearer your_token",
                "Referer": document.referrer
            };

            const bodyJSON = {
                "id": id,
                "clientTxId": clientTxId
            };

            const  url = "https://pay.payphonetodoesposible.com/api/button/V2/Confirm";

            fetch(url, {
                method: "POST",
                headers: headers,
                body: JSON.stringify(bodyJSON)
            })
            .then((res) => res.json())
            .catch((error) => {
                // error labet
                const jsonResult = document.createElement("pre");
                jsonResult.textContent = JSON.stringify(error, null, 2);

                // Add <pre> label into <div>
                const container = document.createElement("div");
                container.appendChild(jsonResult);

                // Add the response to the body documetn or any specific container
                document.body.appendChild(container);
            })
            .then((data) => {

                // Creamos las etiquetas <a>
                const jsonResult = document.createElement("pre");
                jsonResult.textContent = JSON.stringify(data, null, 2);

                // Show links in the docyuments with linespace
                const container = document.createElement("div");
                container.appendChild(jsonResult);

                // Add the links in the body documents or specific container
                document.body.appendChild(container);
            });
        </script>
    </head>
    <body>
        <h1>Confirm transaction with Fetch</h1>
    </body>
</html>
🎨White-Label Configuration:
To begin customizing the payment box, it's important to understand how specific parameters influence the behavior and user experience of the service.
🔢Injecting Data
You can inject the following parameters during the Payphone initialization process: phoneNumber, email, and documentId. These values must be provided for each individual transaction. Static or reused data is not allowed, as doing so may result in transaction rejections and could lead to user accounts being flagged or blocked.
⚠️Important: Supplying false or repetitive data may trigger fraud detection mechanisms. Payphone is committed to upholding data privacy and security standards. To maintain a secure payment environment, it is essential to follow these guidelines.
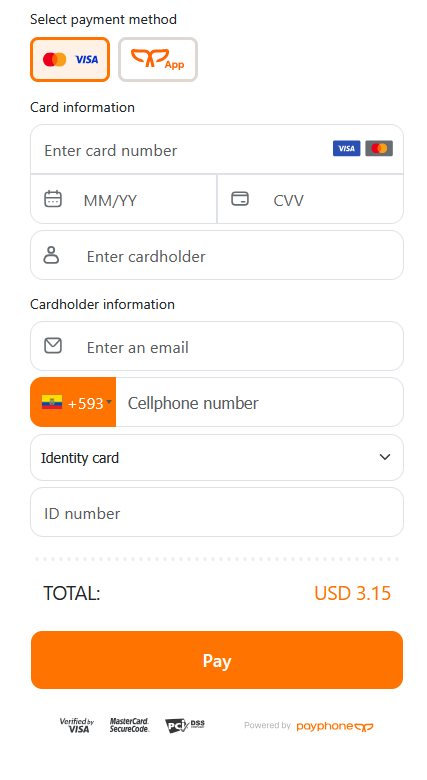
Once the setup is correctly configured, the payment box will render on your page. If the phoneNumber, email, or documentId fields are injected, the payment box will display as follows:
🖌️Customization Parameters
The payment box offers a range of parameters that allow developers to tailor its appearance and behavior to meet specific requirements.
Below is a breakdown of the Visualization Parameters, which control how the payment box appears on your webpage:
📝Visualization Parameters
Sets the default payment method. Use 'card' for credit/debit cards, or 'payphone' to pay via Payphone wallet (available only in Ecuador).
Default: 'card'.
Shows or hides the card payment method. Default: true.
Shows or hides the Payphone wallet option.
Default: true.
showPaymentMethodSelector
Displays the selector for switching between paymentmethods. Default: true.
Shows or hides the main "Pay" button included in the
payment box. If set to false, you must provide an
external button.
Default: true.
Required only if showMainButton is set to false. Specifies the ID of the external button that will trigger the payment.
Shows or hides the footer section and associated logos.
Default: true
✏️Custom Button Integration
The Payphone payment box is highly customizable, allowing you to control the visibility and behavior of its elements to better match your website’s design and user flow.
Hiding Default Elements
🔸To hide the payment method selector (used to toggle between card and Payphone wallet), set the parameter showPaymentMethodSelector to false.
🔸To remove the default "Pay" button, set showMainButton to false.
When you disable the main button, you must also set the customButtonId parameter with the id of your custom button. This allows the payment box to reference and manage the external button—disabling it while a transaction is in progress to prevent multiple submissions.
📃Note: If you hide these default elements, you are responsible for implementing and managing the corresponding actions through your own UI components.
🧱Example:
If you disable the default "Pay" button in the Payphone payment box by setting showMainButton to false, you must implement a custom button and link it to the payment box using the customButtonId parameter.
This setup gives you full control over the appearance and placement of the payment trigger. It also ensures the payment box will automatically disable your button while the transaction is being processed—preventing duplicate requests.
Below is a complete example using a custom button with Bootstrap for styling:
<!-- HTML -->
<!-- Payment Box Container -->
<div id="pp-button"></div>

<!-- Custom Pay Button -->
<div class="ppb-d-flex ppb-justify-content-center">
 <button type="button" id="btnProcess" class="btn btn-warning">Pay Now</button>
</div>
// Initialize the White-Label Payphone Payment Box parameters
const ppb = new PPaymentButtonBox({
 token: 'YOUR_TOKEN',
 clientTransactionId: ‘UNIQUE-ID’ // Unique identifier for the transaction
 storeId: 'YOUR_STOREID',//Store ID from your Payphone account
 reference: 'Payment test', // Transaction reference
 lang: 'en', // Language
 amount: 315, // Total amount
 amountWithoutTax: 315,
 phoneNumber: '+593999999999',
 email: '[email protected]',
 documentId: '12345678',
 // UI customizations
 showCardPayment: true, // Enable Card Payment
 showPayphonePayment: true, // Enable Payphone Payment
 showPaymentMethodSelector: false, // Hides the method selector
 showFooter: false,
 showMainButton: false, // Hides the default button
 customButtonId: 'btnProcess', // Link to your custom button
}).render('pp-button');
// Set up the payment trigger
document.getElementById('btnProcess').addEventListener('click'
, () => {
 ppb.startProcessPayment();
});
You can also implement a method selector (e.g., Card vs. Payphone wallet) using your own custom buttons. In the example below, the user selects the payment method before clicking "Pay Now":
<!-- Payment Method Selector -->
<div class="ppb-d-flex ppb-justify-content-center mb-3">
 <button type="button" id="btnCard" class="btn btn-primary
active">Card</button>
 <button type="button" id="btnPayphone" class="btn btnprimary">Payphone</button>
</div>
// Handle custom payment method switching
document.getElementById('btnCard').addEventListener('click', () => {
 ppb.changePaymentMethod('card');
 btnCard.classList.add('active');
 btnPayphone.classList.remove('active');
});

document.getElementById('btnPayphone').addEventListener('click', () => {
 ppb.changePaymentMethod('payphone');
 btnPayphone.classList.add('active');
 btnCard.classList.remove('active');
});
💡Tip: When using your own buttons, remember that you are fully responsible for handling user interaction and UI feedback.
🔚Final Notes
Since the custom buttons are declared directly in the HTML, they must be referenced and wired to the payment box's methods via JavaScript. This approach gives you flexibility, but also requires careful configuration to ensure a smooth and secure user experience.
💡Tip: Always test your custom implementation thoroughly to ensure buttons behave correctly during processing.
🎞️Video Tutorial
Learn how to integrate the Payphone Payment Box in minutes with our video tutorial.
